Saturday, November 30, 2013

REVIEW: Essence - Stay no matter what liquid liner

I had this little baby catch my eye on a trip to priceline, the Stays no matter what 16hr waterproof liquid liner by Essence. Priceline has probably only started stocking this brand recently in the past 12 months and I must say, I love the fun quality products you get for such a small price! 

I kid you not. It cost me a grand total of $4.25 at RRP (and is one of the higher priced product of the range). 

Thoughts:
Nice packaging, no complaints at all. Twist off cap with attached wand.


Long brush tip which moved really nicely and was soft which is great so you're not scratching around your eye area. Coated with a nice amount of product. So far so good!


Application was super easy and really comfortable. I drew a nice line with ease and in moments with no dry areas or draggy bits! The soft brush made it easy to create a flick with a brushy edge. 

Does it stand the test of time? Well now it has been 8 hours on and I don't see any need for touchups at all.


Overall I have to say, I've tried liquid liners from BYS to Clinique and even Gel liners with brush applicators from Maybelline and this one, my friends, has been my favorite so far, and for the price it costs - can somebody say godsend?


I highly recommend this.


Saturday, May 18, 2013

SWATCHES: NYX Round Lipstick B52 Dupes

Alright so I know that "dupe" posts are usually done to find a cheaper duplicate of expensive branded colours and shades, however I have found that my all time favourite "everything goes", "my lips but better" colour is the all famous NYX Round lippie in B52, I love it and its the only lipstick I've managed to reach the bottom of the tube of!

So, whats my issue? I can't get it in Australia without paying a premium, and since I know its not a high end formula however I am in love with the colour and creaminess, I wanted to find something with a duplicate colour that either matched the price that I could source locally (without the premiums and shipping costs), or if I had to pay more, the formula had to be of higher quality.

So here we have it, Ive found 2 close shades to my fave B52.


COMPARISON STATS
NYX Round Lipstick in B52 (4g) = $4.00 (plus shipping costs from the US!)
BYS Matte Lipstick in Salsa (3.5g) = $3.95
Chi Chi Viva La Diva Matte Lipstick in Style Stealer (3.7g) = $18.95

RESULTS:
BYS Matte Lipstick in Salsa
This lipstick is cheap as chips and I can buy it locally here in Perth (Western Australia). At $3.95 I can get a tube of my favourite go-to colour in a very soft matte finish. In comparison to the NYX, the formula is not nearly as creamy and maintains a very firm and sturdy tube of colour. Does this mean the colour is hard and flakey? Absolutely not! It applies with a wonderful matte and feathery soft finish if you can imagine that. The texture is great and colour is buildable. This shade has slightly more warmth to it than the B52 which is a tad bit more mauve.


Chi Chi Viva La Diva Matte Lipstick in Style Stealer
I'm not sure as to why they called it a "Matte Lipstick" (perhaps because it doesn't have any shimmers), but this formula is a gorgeous gorgeous cream formula. Just as rich and creamy as the NYX B52 but you can definitely tell the difference in terms of higher quality (at $18.95 you'd hope so!). Think buttery and creamy, but sturdier than the B52 (which always broke and moved around in the tube because it was weaker and basically creaming on itself in its own fault lines). The colour is slightly towards the lighter mauve/pink side and lacks that earthy tone through it that the BYS lipstick has. Also, there is a slight botanical scent which gives a mental indication of higher quality ingredients (think along the lines of a faint jurlique smell), YEP, smells expensive!


VERDICT:
Im really loving the colour balance of mauve and earthy tones in the BYS matte lipstick and I will definitely be reaching for this one for work. However the Chi Chi Viva La Diva is the go-to if I need some moisturising on my pout and a slightly lighter colour (or an overall more luxurious application and wear experience).

Friday, May 17, 2013

SHOPPING: Lovisa and Colette Jewellery Sale


Who loves a good sale, I know I do! Look at these bargains. HAPPY :D
Now for their closeups.


I love these jewellery bargains, you can find some awesome pieces that are so cheap but don't even look cheaply made. I also tried to get some smaller pieces as I get more wear out of them day to day.Last but not least, me wearing the dark red Lovisa earrings. VAMPY!

Sunday, June 17, 2012

NOTD: Milky Pink with Black Tip Nails

THE NAIL LOOK:
A French style manicure featuring a milky pink base and black tips. A special request from my man!


Loved the way it turned out, however it did take many coats to build up the milkiness of the sheer pink, many applications of the black to try get it as smooth of a curve as possible, and many top coats to encapsulate any lumps from layering! 

I probably a few hours doing them :o (but I was doing things inbetween coats like watching episodes of CSI, on my computer, even taking in the laundry etc). I didnt want to pile a thick layer on all at once because that would be impossible to dry! The finished product is worth it however - oh so smooth, glossy, and awesome.

 THE PRODUCTS I USED

Maybelline Salon Expert in Sheer Ballet Pink: Beautiful milky pink shade strengthening formula polish with a curved precision brush. I layered this god knows how many times until I achieved a gorgeous cloudy 'acrylic effect'.

Jezy Nailpolish in 45 (black): Just a $2 cheap polish sold in most Australian pharmacies, still relatively full so it still has a decent runny consistency for smooth painting. 2 Coats to reach complete opacity, but I applied more times just because I kept trying to get the curve perfect.

Sally Hansen Insta-Dri Anti-Chip Top Coat: I absolutely LOVE this stuff, dries so fast, coats like a wonder. Its smooth, glossy, hides lumps and bumps from annoying lumpy polish beneath ;) I applied 2-3 coats for that thick glossy acrylic look.


LIGHTS CAMERA ACTION!
KAPOW!


Monday, June 11, 2012

SHOPPING: Claw Bracelet & Fingerless Gloves

Got some goodies in the mail!! Aww yea :)

PURCHASE 1: Eagle Claw Talon Bracelet


A super sick claw bracelet. Can anybody say wild? 
Got this off eBay from seller eyeliketobuystuff (haha) for only AUD 6.45 and free shipping! Super sturdy metal, a nice dirty copper bronze finish, featuring a hinged clamp style mechanism - i do like it a lot. I'm pretty sure I've seen more out there sold in silver and a bright and shiny gold finish. Plus there are talon rings too.


PURCHASE 2: Fingerless Palm Gloves

I have bought gloves before from eBay - some good, some bad - one of which was made out of lesser-quality material (stiff and plastic-like with raw edges with the lining poking out in an unsightly manner) and it just wasn't my cup of tea. However this one is a win! Thin/refined & soft leathery quality with a nice comfortable lining. Perfect for a fresh to chilly day or clubbing at night when its a little colder. 

Feels good on hands, looks like leather (specifies it is made out of quality faux leather), because its thin it doesn't make hands look bulky which is awesome, stitching is slightly off but its so minute no one will notice - besides I only paid AUD$ 15.70 for them! Great deal for the better quality gloves. There are ones on eBay going for $5 - $12 but I'm pretty sure those are the thick plastic-like ones. Ew!

This one was a great purchase - will go back for more colours ;)
Bought them from this store


Action shot! 
P.s. Natural nails for breathing time. New look coming up soon ;)

Wednesday, March 9, 2011

LOTD: Boy Toy by PureLuxe Cosmetics


A look using PureLuxe cosmetics mineral eyeshadow powders.
The star colour of this look is "Boy Toy", a rich peacock blue with green reflects/duochrome. 
Its one of my favourite colours from their line... have a look! Its under their "Fall Collection", I've just linked it here.

I really should get around to swatching all the colours i got from them, they are quite lovely, and really cheap too ($1 to $2 for the "1/8th tsp in a jar" sample sizes, which in my opinion, is still more than enough, and have last me a LONG time).


When used foiled (wet with water or mixing medium) the green comes out more. I absolutely love this colour!
I did this look for my dads birthday, so i just quickly snapped some shots, and i didnt take much other note on the other colours used, i know they were all PureLuxe eyeshadows though for this look.

Lips, i used NYX round lipsticks, a mix of B52 and Circe!

P.S i know my false lashes look really obvious in the last picture, but i was in a rush :P

Saturday, January 29, 2011

LOTD: My little sister attends a Red Carpet Party


I think you've all seen my sister (Joanna) before, in my previous posts. She always gets me to do her makeup for her balls and themed parties. This party was a Red carpet theme, and originally i was going for a classic red lip, nude eye, and winged liner look, but when she showed me her dress, i knew that something else would suit the outfit better. It was a deep royal purple dress, so i thought that i would do a really classy and mature wine coloured look, and make her look expensive by using champagnes and golds, along with sparkling accessories.

I was actually in a huge rush when i did her makeup (rushing home from the beach, i only had an hour to do everything including hair), so i didn't manage to document the steps or products i used. I only know that the lips are a combination of Kartricia lip tar (creamy purple) mixed with a deep Berry red lipstick that i owned, applied with a lip brush.

Turned out nicely, she looked elegant and classy imo. Hope you guys enjoy this look!

i dont know why, but the colouring of this photograph is a bit off...
the next two are better colour references (on a mac book pro calibrated screen)
i cant garuantee what colours you are seeing if u have another monitor! :P


Saturday, January 22, 2011

My first go at Eyelash extensions

Just to clarify, I am not a trained professional nor am I a student undergoing professional training in eyelash extensions; I just bought the supplies off ebay because i thought it would be interesting to try it out myself, and with the help of some vague youtube videos outlining the general procedure performed by trained professionals. I know a lot of people have been urging never to try do this yourself, or never to let an untrained person do it for you, but in my pre-defense, I have extremely good hand coordination (5 years art scholarship + design degree), and i practiced on fake lashes first :) 

Disclaimer: I am very aware of the many risks involved, i did a weeks worth of research reading up on every article, website and watching every video. This post is not a tutorial, and I am not trying to encourage you all to try pick this up and try it yourself, there is a possibility something could go wrong if you are not careful and don't do your research (or undergo proper training for that matter). This is just a record of what i decided to go forward with after weighing out the risks, after doing patch testing and practice on fake strip lashes. It is quite difficult to do, so don't let my post influence you in any negative way...this is just what i have done. I do not plan to carry this out as a professional service, because, well I'm not a qualified professional. The participant receiving the lashes were also aware of the risks :)

So meet my friend, Reena; she naturally has very short lashes, that measures from 1mm to 4mm at most, and has never liked wearing fake strip lashes daily. Luckily, her lashes arent also sparse, so extensions would be the perfect solution for her, since eyelash extensions are individual lashes adhered to an existing natural lash with very strong semi-permanent black glue (not the same glue used with strip lashes etc, this stuff is MUCH STRONGER).

Here is a picture of what her natural lashes look like:

So i had to set up for the proceedure, which includes steps such as taping down the bottom lashes (VERY IMPORTANT NOT TO MISS ANY HAIRS), priming the lashes (ridding it of any oils/residue), and using a lash comb to neaten the lashes (so its easier to work with).


After the first few lashes were placed down, this is what it looked like:

After many more were placed down..look at the difference! (i placed 8mm lashes, J curl):

Starting progress on the other eye:


More progress....


The results were  really good :) no mishaps occurred during the proceedure, my friend fell asleep haha, it was very time consuming though...it took a total of 2 hours per eye (4 hours)! we took a dinner break in between :P


BEFORE:


AFTER:

she finally has some natural looking lashes she can flaunt! yay for success!

Tuesday, January 4, 2011

REVIEW: Garnier Clean Detox vs. Loreal Perfect Clean

I haven't done any reviews on skincare before, and i recently bought two new facewashes, so i thought it would be nice to share my thoughts and experiences about them! Both of them were around the $AUD 10 or less mark, i think they were on discount though, not sure.

My Skin type: I have very dry skin that flakes alot around the T zone and nose area, i do not have sensitive skin, even though I have very dry skin, my skin does get a little tacky and slightly oily (or rather clogged pores, not really 'oil') during the scorching Australian summer months.

What I look for in a facewash: non-drying/moisturising, refreshing (but not menthol-y), a scrub of some sort to exfoliate gross flakey skin and clear out pores, and a great smell. I do not like facewashes that have acne clearing acids and menthols in them as they are wayyyy to harsh/drying for my dry skin - it would probably make my whole face flake off!


Garnier Clean Detox:

This is a foaming 'purifying gel' that claims to help:
- neutralize toxins and impurities
-Remove impurities and makeup
- Boost radiance


Pros: Its a liquid gel texture (as u would get in most gel facewashes), its clear, and it smells SO GOOD! It smells like refreshing green tea, and it foams like a dream. It also comes in a pump bottle which is convenient.

Cons: For those of you who need a scrub to do that bit more (to get down into ur pores and remove unsightly flaking skin) this facewash is just too 'soft' to do anything like that, i usually add my Vichy's face exfoliating beads into it, and then it works well.

Overall Verdict: It smells divine, it foams nicely, it leaves my skin feeling light and dewy, but it wont scrub out my pores and flakes if i have any, but for a hot summers day, it is great to remove that uncomfortable sticky/tacky feeling and to just freshen up your face.


 Loreal Perfect Clean:
It comes in a very interesting looking bottle with a face scrub attached to it (they call it cleanPod) and i chose the one which says 'glow' :)

This is a close up of the clean pod in different lighting, click on the picture to get a closeup view :)
The tiny protruding bristles are quite flexible and seem quite effective for scrubbing and buffing the skin with the facewash.

This is how it is removed

The actual formula of this facewash, surprisingly, smells EVEN BETTER than the garnier clean detox, its a DIVINE APRICOT smell! Makes you wanna eat it :D Better still, it has tiny exfoliating beads in it that are perfect for the pores and flaky skin. The ONLY thing i would say about this is that i prefer not to use the actual facewash with the cleanPod because i feel that you make more use of the gritty exfoliating beads when you use your fingers to really massage it into your skin. I tend to swap and use the cleanPod with my garnier detox because it has a lack of abrasion.

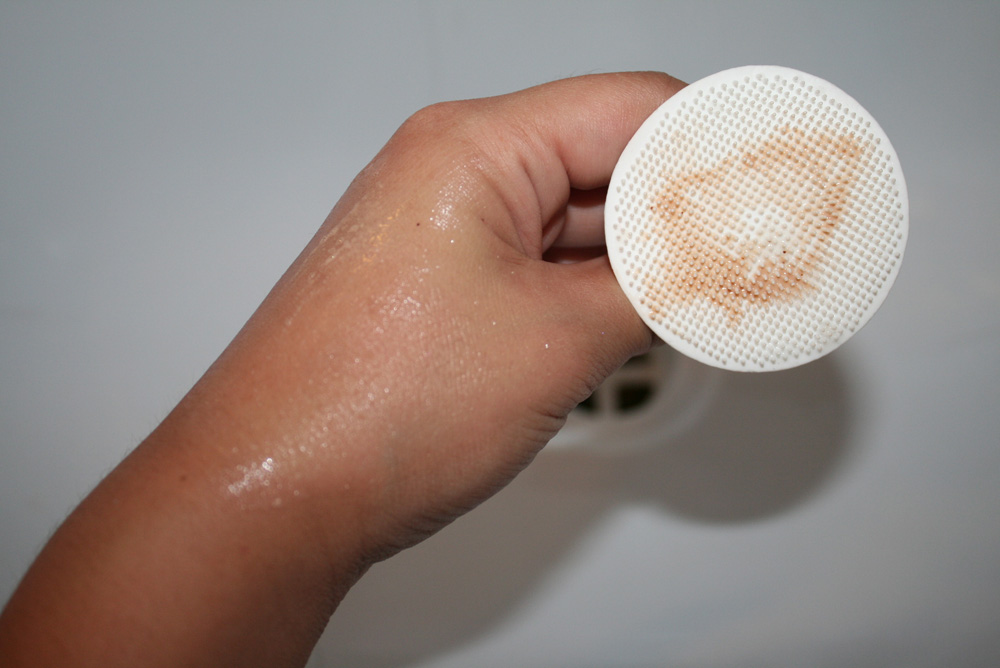
This is just an example of the cleanPod in use, after i scrubbed the back of my hand that i had tested foundation on; and yes, i have used it on my face before, and i am quite the happy customer.

Better yet, when the cleanPod is placed back into the bottle, there is a suction cup on the back of it, making it able to be stuck onto the shower wall. Its a pretty nifty gadget

Pros: Best. Smell. Ever., effective scrub, awesome cleanPod, just the right amount of foaming, lovely gel texture to the wash, leaves you fresh, and cleansed; cool suction contraption to the cleanPod.

Cons: I feel that the cleanPod doesn't effectively make use of the formula's gritty scrub, because it has little teeth of its own so it doesn't really push the scrub into the skin. Because the scrub has great grittiness which is awesome for my dry flakey areas and pores, i don't use it to remove eye makeup in the shower - i would rather use my garnier for this job.


VERDICT: If i seriously only had to have one, i would choose the Loreal perfect clean in Glow because of the smell and multiple exfoliating options, but honestly both of them have its benefits (such as the garnier being soft enough to use to remove eyeshadow without getting exfoliating beads into my eye), and honestly i use them together, i mix the two, and sometimes i just use garnier with the cleanPod scrub. Having them both has been a WIN-WIN situation for me :)

Hope that was of some help and interest to you all!

Sunday, December 5, 2010

Story of my life - and eyelash extensions

My life right now:
I know i havent updated in a bit, but just to let anyone out there following, I have officially finished my last semester, and will be graduated at the beginning of next year; I've just been busy the past week setting up for the graduation exhibition that was held, attending it, going to graduation parties, and most importantly, spending the last few days with my beloved as he is returning back to Norway (as now he has also completed his degree here in australia), and then he will be moving to Iceland shortly to commence his masters degree at the university there. We will be far far away from each other :( and i honestly have no idea how Im going to cope :(

I guess on a happy note im graduating, yay :)

Eyelash extensions:
On a beauty related note, i bought some eyelash extension supplies off ebay (and i know alot of people stress that you shouldnt do it yourself or get an uncertified person to do it for you) but im cheap and stubborn and i know how to do my research okay :P so i kinda trained/coached my sister how to do it, and she gave me a set of semi-permanent lash extensions! They do look gorgeous and turned out nicely :) will do a more detailed post on that soon if any of you are interested let me know! 

xoxo

Wednesday, November 17, 2010

LOTD: Lashy neutral


I was having a good lash day :P
and i dont remember what i used, but it doesnt matter, its just neutral colours, i just loved the way it turned out, it had that 'pinup' look to it aswell with the wing :)


Uni is OVER in 2 days!!!!
:D

Monday, October 25, 2010

LOTD: My little sisters Masquerade party

Hey you guys, my sister had a masquerade party and since i always do her makeup for parties, i decided to document the general process of this one! I did this look like a month ago but i never had time to upload it properly, and since im stressed out with homework i thought that i might aswell destress, take a break :P whatever.

here are the pics!

enjoy!
xx

STEP ONE:
I rolled her hair (almost dried hair) in curling rollers hours in advance, heated it with a hair dryer on the hottest setting with the least force, so it doesnt go everywhere and frizz, then set it with hair spray.

Hours later i then proceeded to do her foundation, concealer, eyebrows, and NYX Jumbo Eye pencil in Milk as an eyeshadow base, smudging out all over the whole eye area.


STEP TWO:
Pat an aluminium silver onto the lower lid, i used the one from my 120 palette...its the best silver ive ever tried/owned! So buttery and refined, i LOVE IT! Oh and a white or white silver in the inner corners.


 STEP THREE:
wing out the eyeshadow until it just connects with the brow with a darker silver. Repeat for other eye.


 STEP FOUR:
Shade a metalic dark blue into the crease and blend upwards and out with a lighter metalic blue shade. Highlight under the brow with a champagne or white gold shadow.


STEP FIVE:
Add liquid eyeliner and draw the whole length of the eyeshadow 'wing' until it connects to the brow bone. Add false lashes! dont forget bottom ones too for a dramatic masquerade look :)


STEP SIX:
Add gems to the eyebrows for a more themed look, apply a baby pink lipstick and gloss
&&&
Take out rollers, dont be shocked by the crazyness of the curls!, just brush them out with your fingers and run a shine serum or curling balm through them, flip your head/hair around abit until it looks natural and falls into place :)

FINAL LOOK!!!!!


Hope you liked them!! :)